
This post is really for anyone out there wanting to save some money and do their baby’s first birthday pictures themselves! That being said, I am really trying to look out for my November BBC and IG mamas who have babies turning one in the next couple months;) If you didn’t read my last blog post, I recommend you do. A lot of the set up for this cake smash is actually really similar, but I will do some recapping too.
First off, what is a cake smash photoshoot? The basic idea is to celebrate your child’s first year by giving them their first taste of CAKE while taking beautiful pictures of it! Some probably think this is silly, and yeah maybe it is, but its also adorable and creates lasting memories you will love.
Here’s what you will need for this:
1. Backdrop stand. In my last post I shared a link to the one my fiance made for me. It is made out of PVC pipe and cost about $20. Very useful, and you can easily store it for later use!
2. Backdrop. I have recently discovered seamless paper. For $25 I got a roll that is 52″ wide and it is 107′ long! So it is going to last awhile, even with cutting the bottom few feet off that were covered in frosting handprints lol. There are endless color choices, for this session I used “coral.” In my last post I told you that you could use even a sheet for the backdrop and that is still true. A $7 sheet from Walmart could be clipped to your backdrop stand. You could even tape it up on the wall if you don’t want to invest in a stand. (The seamless paper saved me a lot of effort in post processing, as there weren’t all the wrinkles and folds to try editing out!)
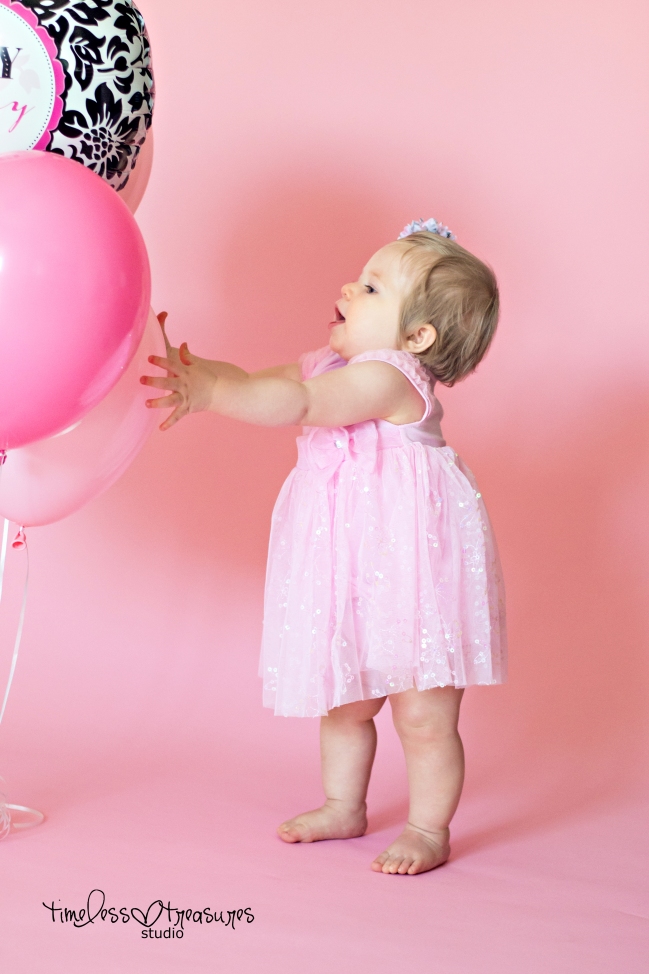
3. Decorations (Optional). I made a pennant banner out of scrapbook paper and ribbon, and we also had a bouquet of balloons. I wouldn’t go too crazy, you want the focus to be on the baby and the cake!
4. Plexiglass sheet. I used this again to help keep the paper from getting wrinkled under Summers wiggly butt. Plus, I like the reflection!
5. Camera.
6. Good lighting. I prefer natural light to flash. So again I set up next to our big glass sliding door in our kitchen.
6. A soon-to-be one-year-old. Summer’s mom volunteered her to go first!
8. A cake!
Here are a couple pull back shots of my set up! The first is the set up for a couple pre-cake photos, and the second is how I set up for the cake shots:

 (In the end I actually pulled the pennant banner down more, because that high they weren’t making it into the photos!)
After a little editing in Lightroom and Photoshop, here are examples of the photos I got with those set-ups:

 Now, for some tips!
You are going to need backup. That means dad or a friend needs to be there so you can focus on taking LOTS of pictures, and your backup helper can focus on snatching up the squirmy baby and placing them back with the cake. And just in case your baby doesn’t seem to interested, they can also be there to help them with that first taste, etc.
Keep shooting. I took about 200 pictures of Summer and ended up with about 15 really good pictures.
Take before and after pictures of the cake. Take pictures from different angles. Take distanced photos, up close photos. Change up the focus, instead of just focusing on her face, focus on the cake, messy fingers, toes and tummies! Take pictures of the grumpy faces too, they can be just as cute!
Have a bath ready. This IS going to get messy. Somehow I even had pink frosting on my own face.

Of course, these wouldn’t look nearly as nice without a little help from Photoshop. Up next I am planning a DETAILED Photoshop editing tutorial specifically around cake smash photos. So watch for it!
Thanks so much for reading, and I hope I helped out with your own at-home, DIY cake smash shoot. If you have any questions, leave me a comment:)


What brand did you get the pixie glass?.
I absolutely love this! Please let me know how to follow you and your how to do’s please and thanks!!
LOVE this! I’m slowly becoming a photographer & planning on taking 1st birthday shoots, are strobe lights neccesary? Thanks in advance!
Where did you get the seamless paper?
What size plexiglass did you get and from where and for how much?
Do you remember the lens and settings you used?
I love your post it is very informative can you please tell me where you found the seamless paper for that price ? Thank you very much
How much did you pay for that piece of Plexyglass?
Can this type of seamless paper just be taped to a wall and draped down? Your thoughts?
I have tried the plexi glass but have had a hard time editing the edges out….any suggestions?
Where did u get seamless paper for 25.00 for so much
I don’t even know if you will get this but I LOVE your work here – I’m curious about your lighting though. Do you use extra light or do you just set up by a light filled window? My set-up is great but I don’t have enough natural light so I need to bump my darn shutter down or my ISO up and the pictures are not nearly as wonderful as they could be! Thank you!
Ok so I meant to say I know you set up by your glass sliders, but are the sliders behind you or behind her or just to one side? Thanks again – I’m impressed with your lack of shadows as well!
Brilliant what aperture was you using
I have been reading everywhere you need the 101″ seamless paper because kids move around a lot etc, but I felt like taking something that big into someone else’s home would be a bit big / too much ( I am usually an on location photographer looking at options for winter time haha ) so I figured for cake smashes and the rare newborn shoot with a paper backdrop the 53″ one would be perfect and you have proven this to be true 🙂 thanks! 😀 great and very helpful post.
So you have a photoshop tutorial on smash cake sessions? If so can you send me the link?
Awesome, thanks for sharing!!!
This is awesome!! Where did you get the seamless for $25 if you don’t mind sharing 🙂
Thank you!
Where did you get the large role of paper and plexiglass?
Thank you so much for this tutorial, just what I was looking for. One question, what settings should I pick for this photoshoot with a Nikon 3300?
Hi, I’m doing a cake smash for my neices 1st birthday at home and was wondering what the class that she sits on (in your photos) is for?
How big was the plexiglass you used here? Thanks for all the info.
I’ve been reading all your DIY photoshoot posts and I love them! It’s given me a great starting point and a checklist. I had a newborn shoot done for my daughter and the photos are wonderful but they just cost way too much. My husband thinks I’m ridiculous but I’m determined to do all my own shoots and editing now. Starting with a cake smash! ☺ so thank you for taking the time to help other new mums like me.
Thanks for this. Fab post!
What are the measurement of the backdrop base?
What editing programs did you use? Which versions, etc?
hi where did you purchase the back drops paper from thank you so much everything is really helpful
Hi, I want to do a smash cake session for my son’s first birthday at home but I don’t think I want to use the PVC pipes, can I just use the seamless paper?
Hi ! Just wondering what camara are you using,also is that a 50 mm portrait lens! You shots look amazing !
Thanks
What settings were your camera on? These look so professional. I was thinking of trying to do this myself for my sons birthday in October but im afraid mine will look really amature.
Bronwyn
Hello!! Wondering where you got the plexiglass sheet? Tried looking one up on Amazon but unsure if dimensions I should get and thickness !! Btw these pictures are beautiful! Just started using photoshop recently myself!
weee love it. gave me some new idea. just a question though. were those helium balloons?
Yes!
Very informative THANK YOU I read the kind of camera used but do you mind sharing what kind of lens?
I used a 50mm 1.8 for these:(
:)*
Would you mind showing me some before pictures!? I’m a photographer that’s really really starting to become indifferent about this while photography thing! I feel like I’m just not that great of a photographer and that photoshop os the only thing that saves me at times and I was thinking Maybe if I saw a few of your shots from before it might motivate me and hopefully help me realize I’m not alone and no ones shots are perfect or that great before post processing lol! No one seems to have the courage to actually post before shots though so it’s got me in a funk! Of course I have no problem with you putting a huge watermark right in the middle of your subject as I’d find this to be an odd request as well lol! But I promise my intentions are legit🙂 id love to start following your blog as well if you could shoot me an email with how I go about that!? I live in Oklahoma and I’m a homeschooled of – 7 and 3 year old and I’m also a sahm🙂 I want to get more serious with my work but it can be overwhelming! Maybe you wouldn’t mind having a a new friend to chat with!?🙂 I’d love to know what Lens you used as well! Maybe that’s part of my problem!? I’d love to hear back from you and I’ll save this page and come back ever so often in case I don’t hear from you soon! Thanks so much for posting this I found it on Pinterest in case you have an influx of viewers and wondered why!? My email is chelsea.m.roberts.1989.@gmail.com with no periods lol I didn’t want to get spammed haha! Hope to hear from you real soon!
Check out my follow up post here: Cake Smash Editing
I am sure this is going to turn out harder to explain than I want, but I am going to try this anyway. You saw the set up, you know what you need to …