Okay here it is guys!
I believe that everyday is just another day to capture more memories, as most of you probably already know from my endless photo posts. I LOVE having my candid shots of my son doing his own thing, playing with toys, trying a new food for the first time, etc. But, sometimes its nice to have some of those really cute studio-looking pictures too, right? And I don’t know about you but I’m not about to chuck out a couple hundred dollars to Target Photo Studio when I can do them myself! Now, its not free to get pictures like this but it is relatively cheap considering what it can end up costing for you to go out and get them “professionally” done.

So let’s go ahead and start off with the needed supplies:
1. A camera. I have A NikonD3100, but really even before that I managed to get similar photos (much lower quality of course) with my iPhone 5 camera. In addition to the D3100 I also have a 50mm f1.8 lens. I could go into why that lens and that camera but that is enough for a whole other post another day. Basically, it has better focusing capabilities and I can shoot in lower lighting (like indoors).
2. A backdrop. There are so many cheap options… In these photos I used a $7 black bed sheet from Walmart. Yeah, really that simple. You can spend $75 on a black muslin photography backdrop if you want, or I have heard seamless paper rolls are relatively cheap and work well. All I know is they aren’t sold in store and I don’t have to patience the wait on shipping!
3. A backdrop stand. This really depends on how creative you can get. My fiance built my backdrop stand out of PVC pipe. This is the one we did: http://www.dandelionsonthewall.com/2012/04/diy-photography-backdrop-stand-pvc-pipe.html It was about $20 to make and I have used it many times already. Totally worth it, and then it breaks down for easy storage. Honestly, you could tape the sheet up to the wall if you wanted…
4. Optional: Acrylic sheet. That is what creates that reflection across the bottom of these photos. Mostly I needed something to keep my floordrops (most of which I use sheets for) from crumpling up underneath my squirmy 8 month old boy. This was also about $20 at Home Depot.
5. An adorable subject. I prefer my son.
6. Photoshop or a similar editing program. That’s what I use to edit my photos, it’s what I know and what I am comfortable with.

I took these in my kitchen with our big sliding glass door behind me and slightly left, so that I could get some good natural light in the pictures. I don’t like using flash because of the harsh shadows it can cast amongst other reasons. Still I had to crank my ISO setting up to 800 and bring my aperture settings up to f2.0 to get the shutter speed fast enough (to avoid blurry pictures) without letting the photos be too under-exposed (dark).
Looking at my set-up, there are a lot of imperfections and I am totally okay with that because Photoshop and I are very best friends. I got my sheet set up on my backdrop stand, laid down my acrylic sheet, gave Owen a cookie, set him down in the middle of the sheet on the floor, and grabbed my camera.
Right out of my camera this is what I ended up with:
If you will notice, there is lint and hair (thanks Bentley) all over the black sheet, under the acrylic sheet, not to mention the wrinkles you can clearly see across the back… Yeah, not too attractive. Plus that ugly white line the back of the acrylic sheet leaves across the middle of the photo. Oh well! Photoshop! If you don’t know Photoshop, this part won’t make much sense to you (but hey, I am open to any questions you might have, just leave a comment or shoot me an email!).
First thing I like to do are all the touch-ups and cropping. Using the spot healing brush I smooth out that white line across the middle, the wrinkles, the lint, the hair… And I also used the patch tool to clean up those stains you may or may not have noticed on Owen’s shirt (blueberry applesauce for breakfast). Then I cropped the picture to put Owen more centered. After all that I ended up with this:
Already looks so much better! Next I wanted to smooth out the background a bit. If you are familiar with layering and layer masks, this should make perfect sense… If not Google can lead you to many great layer and layer masks tutorials, that’s how I learned! So I first duplicated the background layer and then applied some blurring effect to it (I like the look of the Gaussian Blur best). Using a mask layer I removed the blur only from Owen so he stays nice and sharp and the background looks much smoother. I also darkened it a little using a new layer, filling it all in with black, taking opacity down to 50%, and again used a layer mask to erase the fill background from Owen (and his reflection). This is what I got at that point:

Then I like to draw a little attention to his eyes and pull out the highlights in his hair. Also, applying a little skin softening effect can look really nice. To pull of these effects I actually use Photoshop Actions. If you don’t know what they are… They are awesome. Any questions let me know; if you want to try any of mine, let me know. On this I used the PTM Picture Perfect Actions “Creamy and Smooth Skin” and “Hair and Eye Highlighter.” Subtle but nice:

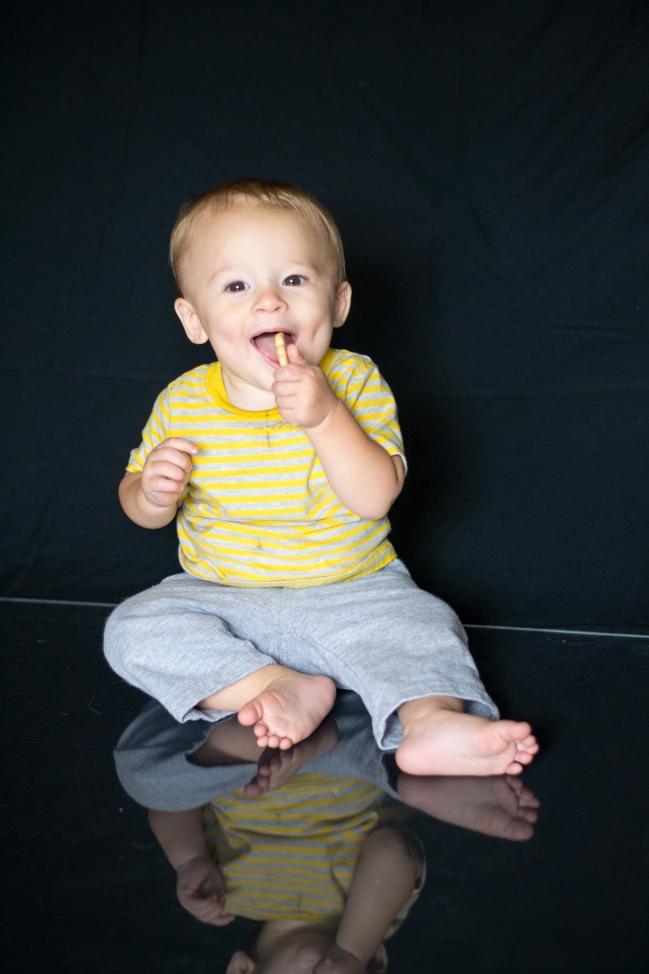
And you can totally leave it at that if you want. I added a very soft color adjustment and cranked up the sharpness for my final product:


Might be too much work for some, but I love it! Once you are used to PS and all the tools, something like this can take just a couple minutes to edit. And there are SO many looks you can get with this set up. For example, our 4th of July picture was done the same way, in the same spot, edited the same! Just with a white $7 bed sheet from Walmart HA!

I am pretty sure I will end up using a similar setup for Owen’s cake smash pictures! I want to get some really good ones that I can use on his birthday invitations… Should be fun.
Thanks for reading guys and I hope this helped some of you out!


How much did you pay for PS? I’m looking into it but even the basic is $600. Am I looking in the wrong places? Also should I just google ” how to ” learn aperture and such? The Nikon manual doesn’t say much. I want to take my DSLR out of auto!
My fiancé works for a computer and technology company so I managed a pretty nice discount on photoshop. I know it is really pricy… But even with Photoshop Elements you can do a lot of useful editing, and that is $100 or less I believe. And yes, google search something like “dslr manual mode tips/tutorial.” You could start here: http://clickitupanotch.com/2010/09/shooting-in-manual-the-basics/
Love this! Love the blog! Always thought of doing one as well. Still haven’t done one yet. 😞 Great explanations and details. I’m a follower!
I found you on BBC Nov 2012 and Omg your pictures amazing! I’m trying to get into photography as well and nu make it look sloop easy! When my husband explains it he intimidates me! Keep it up ima def follow u and I am thinking of doing the cake mask fotos too!:) BTW is that natural light on the pictures?
I found you on BBC Nov 2012 and Omg your pictures amazing! I’m trying to get into photography as well and nu make it look sloop easy! When my husband explains it he intimidates me! Keep it up ima def follow u and I am thinking of doing the cake mask fotos too!:) BTW is that natural light on the pictures?… TIA
Great thanks so much and I am glad I can help! In these yes it’s all natural light, I am set up next to a big glass sliding door (to my left).
Can this same editing be done in Lightroom?
Yep pretty much! Especially if you have LR5, because it has the spot correction feature that you will want to smooth out the wrinkles of the sheet and edit out the line that the plexiglass makes across the back. You can you the brush adjustment the select and darken only background, and also to brighten the eyes and hair highlights!
what is the size of the plexiglass?
Hi,
This is just what I needed! Now, do you have some words of wisdom on getting photos that aren’t noisy OR blurry? I am going crazy indoors trying to get my kids unblurry, and then when I do, theres noise from me cranking up the ISO. Is it my lens? Or me? 🙂 I really want to do this for my son’s first birthday this month and save some $$. THANK YOU!